Sunday, December 11, 2011

Red Velvet Cheesecake


We saw this cake on pinterest, but it had no link to a recipe or instructions on how to make it. So after looking at some other blogs and talking to eachother, I give you the Red Velvet Cheesecake! Warning: This is pretty time consuming and there are a lot of steps, but it IS easy!!

First, bake a cheesecake. If you have a recipe you like, great. If you need one, here is mine! Make sure it has NO crust. You will want to use a spring form pan, and line the whole thing with parchment paper, so it's easy to get out. Let it refrigerate overnight.


The next day, bake a red velvet cake, in a 9" pan. (Recipe below). You can either bake one layer, and cut it into 2, or for thicker layers, bake 2 layers, and just level them so they are flat and even. Set them in the freezer for a couple hours.


Oh- don't forget to save the shavings from your cake. You'll need them later.


When you are ready to assemble your cake, take your cheesecake, and unwrap it.


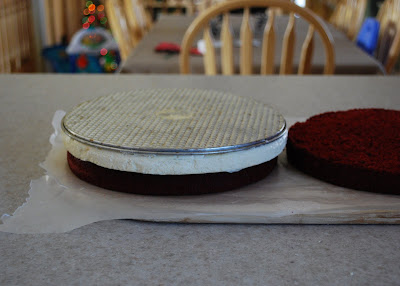
Place it upside-down, on top of your bottom layer of cake.


Then, take off the pan, and the parchment paper.


Then place the other layer of cake on top! At this point, my daughter said it looks like one giant oreo! Yup! I placed it in the freezer for another hour before I frosted it.


Frost it with the cream cheese frosting (again, recipe below)! You don't need to worry about the sides looking perfect, because you'll be covering it up with those cake crumbles you saved.


Just stick those crumbles right on the side, they'll stick good. You can press them down if they don't.

MMMMmmmmmmmmmmm.....

It looks yummy, doesn't it? It IS!


Here's a slice....oh wait- that one's for me! Yum!


Red Velvet Cheesecake


Red Velvet Cake


  • 1 Red Velvet Cake Mix (yes, that's how we roll)

  • 1 small box instant vanilla pudding

  • 4 eggs

  • 1 3/4 cup water

  • 1/4 cup flour

  • 1/2 cup oil

Mix all together and beat well. Pour into 2 9" round pans. Bake at 350 for 35 minutes.


Cream Cheese Frosting


  • 1 8 oz. cream cheese, softened

  • 4 Tbsp. butter, softened

  • 1 tsp. vanilla

  • 2 1/2 cups powdered sugar

Beat cream cheese and butter together until creamy. Add vanilla and beat well. Then add powdered sugar. Add to your desired consistency. If it's too thick, you can add a little milk.

Thursday, October 6, 2011

Molten Lava Cupcakes

I LOVE Molten Lava Cake, but I don't have the little dishes to make them, so when I came across this recipe from Betty Crocker, I was excited that I already had everything I needed to make them. And I think they taste as good as any Molten Lava Cake I've ever had.


  • 3/4 Cup Whipping Cream (I used 1/2 cup)

  • 1 1/2 Cups Semi-Sweet Chocolate Chips (I used half a bag)

  • 1 box Devil's Food Cake Mix

  • 1 small box instant chocolate pudding mix

  • 1 1/4 Cup Water

  • 1/2 Cup Oil

  • 4 Eggs

  • Chocolate Frosting (I just used my own recipe)

In a small saucepan, heat whipping cream until really hot, but not boiling. Take off heat and immediately add chocolate chips. Stir until smooth. Refrigerate for 1 hour, stirring occasionally, until thick.


In large bowl, beat cake mix, pudding, water, oil and eggs. Place batter in cupcake papers, about 1/3 full. Spoon 1 Tbsp. cold chocolate mixture on top of batter. Bake at 350 for 20 minutes. Let cool 10 minutes, then frost. Serve warm. (I have been microwaving mine for about 6 seconds to get them warm again.) YUM!

Thursday, September 8, 2011

Peaches {or strawberries} 'n cream cupcakes


I generally think cupcakes, while delicious, aren't food blog-worthy. These cupcakes are ones that I created somewhat out of boredom and somewhat out of my obsession with good fruit in the summer. Both kinds were crowd pleasing, and very simple to make. If you've got some peaches on hand, I highly recommend throwing some into buttercream frosting. You'll be very happy you did. Okay, here's the breakdown

For the Cupcakes:
1 box of white or yellow cake mix (I did white for the strawberry and yellow for the peach)
1 small package of vanilla instant pudding
1 3/4 C water
1/2 C oil
4 eggs
1/4 C flour
*you can add some chopped fruit if you'd like. I did not, because my child runs from peaches like they're poison. I don't think it's necessary for the flavor, but I'm sure it would add to it.

Mix with a handheld or stand mixer until well combined. Fill 30 cupcake liners 3/4 full. Bake at 350 degrees for 16-18 minutes. Mine were perfect at 16.

For the Filling:
1 cup heavy cream
2-4 TBP sugar, to taste

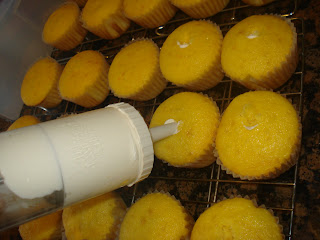
Just whip the whipping cream and sugar. Then use a bismark tip or regular piping tip to fill the cooled cupcakes. You can choose to core the cupcakes to fill them, but I found this worked well and it was very quick.


I also chose to add a little layer of peach jam to the tops, mostly because I'd just made some the day before. 
Not necessary, but a nice touch. 

Now for the magic...the frosting...

For the Frosting:
2 sticks of butter at room temp
1 lb-1 1/2 lbs powdered sugar
1 tsp vanilla extract
1/2- 1 cup of chopped peaches (I only ended up having a little over a half to use)
3 tsp peach jam (optional)

Mix all ingredients in mixer until the consistency is a little thicker than you'd normally want, then add the fruit. If the fruit is really juicy, you may need to add a little more powdered sugar afterward.


 Then pipe in whatever fashion you prefer onto the cupcakes.


There you have it. They're pretty, simple and give summer harvest some serious props. Also, I opted to not top the peach cupcakes with peach slices because a whole slice was too big but smaller bits would just get messy :)

Friday, August 26, 2011

Fresh Pasta Dough

Mound the flour on a clean work surface. Hollow out the center making a well in the middle of the flour with steep sides.
 Break the eggs into the well.  At this point, you also have the option to flavor the pasta..use spinach, tomato paste, or fresh herbs.
 Add the salt, and olive oil to the hollow center and gently mix together with a fork. Gradually start incorporating the flour by pulling in the flour from the sides of the well. As you incorporate more of the flour, the dough will start to take shape.
 With your hands or a bench scraper continue working the dough until it comes together. If the dough is too dry, add a little water; if too wet or sticky, add a little flour.

Begin kneading the dough and keep kneading until it becomes smooth and elastic, about 8 to 10 minutes. At this point, set the dough aside, cover it with plastic, and let it rest for 15 to 20 minutes. You can store the dough in the refrigerator for up to 24 hours, but allow it to return to room temperature before rolling it out.

Divide the pasta dough into 4 even sections. Keep each section covered with plastic wrap or a clean towel while you work with each one. Flour the dough, your rolling pin, your hands, and the work surface.

Flatten a dough piece into a thick oval disk with your hands. Flour a baking sheet for the rolled out finished pasta. Place the oval dough disk on a floured work surface, and sprinkle with additional flour. Begin rolling out the dough with a floured rolling pin working from the center of the dough outwards, constantly moving the dough and lifting it to make sure it's not sticking.
Either use a pizza cutter to cut the dough into strips, or flour the dough generously and roll into a tube.  Using a knife or bench scraper cut the dough into thin sections.  If making ravioli, cut into squares, fill, and seal with the prongs of a fork.  Or cut into thick strips for lasagna.
Unroll each section and place on floured cookie sheet.  Bring a large pot of water, oil, and salt to a boil.  Add fresh pasta, return to boil, and cook 7 minutes.
Pour into a strainer and enjoy with your favorite spaghetti sauce.
Grandma H's spaghetti sauce:
1/2 c onion slices
2 T olive oil
1 lb ground beef
2 cloves garlic
1 3 oz can mushrooms (I usually don't add this, not a huge mushroom fan)
4 cups canned tomatoes
2 8 oz cans tomato sauce
1 6 oz can tomato paste
1/4 cup chopped parsley
1 t sage or oregano
1/2 t accent
1/4 t thyme
1 dash pepper
1 cup water
1 bay leaf
1/8-1/4 cup brown sugar

In a large skillet cook onion in hot oil until almost tender, but not brown.  Add garlic and ground beef, brown lightly.  add sliced mushrooms with liquid.  Stir in remaining ingredients.  Simmer uncovered 2 hours or until thick, remove bay leaf.  (I put the lid halfway on while simmering)  Serve on hot spaghetti.

I hope you guys enjoyed it.  Sorry we ended up eating so late!!

Thursday, June 16, 2011

Chocolate Couture Cake


This cake is really a tale of two cakes. A beautiful fairy tale in fact. One where two delicious cakes fell in love, got married and made an amazingly delicious baby. I came up with the idea for this cake last week while making the Chocolate Mousse Crunch Cake from our beloved friends at Our Best Bites. The cake calls for a baked Devil's Food cake, prepared according to the cake mix directions. Well, as soon as I read that, I thought to myself "hmm, this could definitely be better". This is due to the fact that I rarely make cake mixes without adding some "extras" to it. This made my mind think of Becky's Yummy Chocolate Cake recipe that I had also previously made. Ironically, or I'm going to say, by fate's design, Becky blogged about that cake that very day. We came to the conclusion that we needed to take these two awesome cakes to the next level by combining them. So there you have it, the tale of how this cake came to be.

Now, let's do this thing. Here's the rundown.

The Cake:

  • 1 box Devil's Food Cake Mix
  • 1/2 Cup water
  • 1/2 Cup oil
  • 4 eggs
  • 1 Cup sour cream
  • 1 box instant chocolate pudding
You will mix all these ingredients together in a mixer for 10 minutes. Don't ask why, just do it. Because Becky said so okay?  Divide the batter evenly into two 8" round greased pans. Bake them in an oven preheated to 350 degrees for 25-30 mins. Don't over bake these babies or you'll never forgive yourself. This cake when perfectly baked is moist and dense. 

The Chocolate Mousse:
 (This recipe was doubled to add additional mousse layers but you can choose to only to one mousse layer between 2 layers of cake. You know, if you're a sell out.)

  • 1 tsp. unflavored gelatin
  • 1 Tbsp. cold water
  • 2 Tbsp. boiling water (just heat it in a small bowl in your microwave)
  • 1/2 c. sugar
  • 1/4 c. unsweetened cocoa powder
  • 1 c. whipping cream
  • 1 tsp. vanilla

In a small bowl, combine gelatin and cold water and allow to stand for about 1 minute. While gelatin is softening, bring 2 Tbsp. water to a boil in the microwave. Whisk into the softened gelatin and allow to cool slightly.
In a medium mixing bowl, combine sugar, cocoa powder, whipping cream, and vanilla. Beat with an electric mixer until medium-stiff peaks form. Mix in gelatin mixture and refrigerate for 30 minutes.

Ganache Topping:
1/2 cup semi-sweet chocolate chips
1/2 cup heavy whipping cream
Microwave together for a minute or so until the chocolate and cream are able to be stirred together into a smooth mixture. You may want to let it cool just a bit prior to pouring it over the cake.

Let's put this beauty together!

Begin by slicing your two layers in half, so you have four. Do this with a very sharp bread knife, preferably with the cake already chilled. (also, our layers were already pretty flat and level, but if yours aren't you'll want to level the top first)

Place the first layer, top side down. Spread a layer of mousse onto the layer of cake. I used a cake decorator but that's not necessary, just more fun.


Place the next layer of cake on top of that and repeat the process


And again....


After you place your top layer, you'll pour the ganache on the top.....

 Allow it to run down the sides....
isn't that looking divine?

If that wasn't enough, go ahead and sprinkle the top with Heath Toffee Bits, or crushed up Heath Bar, like we did (this part is optional and the cake is fantastic with or without)
Isn't it almost too pretty to eat?  
Well not as pretty as the layer cake Ashley made at our last meeting, but still pretty :)

 That definitely did not stop us.....


This cake is a great balance of rich and light flavors and textures and is sure to satisfy your chocolate craving! Make it for your foodie friends and they'll be impressed.


Layer Cake


Sorry it's taken so long to post this!
Here are the yummy food pics. 


Here's the recipe I used for the chocolate cake.  The recipe is intense to make, but so good.  I like it because it doesn't dome or sink.  I like the advice of putting a paper towel (or cooking spray) down on the rack when you get them out of the pan.  I made the cake the night before.  Chocolate cake tastes better after it's settled overnight. 

Here's the recipe for the filling and frosting.  The marshmallow cream is so yummy! The frosting, I didn't care for it (a whole pound of butter is too much).  I would use a different chocolate frosting.

Tips & Tricks for Splitting Cakes: from Sweetapolita
1. Always start with a cold cake: refrigerate for about 2 hours or freeze for about 30 minutes
2. With a good quality serrated knife (I only use my favorite Mac 10 1/2″ serrated bread knife–this thing is insanely sharp), trim any doming off the top of each layer.
3. Measure the height of your layer with a ruler, then create a score line on the halfway mark all the way  around the outside of the cake.
4. Lower yourself to almost eye-level to the cake. With a gentle sawing motion, slowly move the knife gradually towards the center of the cake, then turn cake 1/4 turn, and repeat until you have cut through the entire layer.

Also more good tips:
50 Tips for Baking Better Cakes

Recipe for simple syrup you can put on your cake or cupcakes to make them more moist. You brush it very lightly on or spray it on.  This is what the pros do.

Tuesday, March 15, 2011

Cheesecake

I am a HUGE Cheesecake fan, and this is by far the best cheesecake I have ever had. Its baked (the way cheesecake should be made) and it is very creamy and tastes awesome.

Ingredients:

Crust:
1 pkg. graham crackers
1/3 cup sugar
1/3 cup melted butter

Filling:
2-8 oz. softened cream cheese (soften at room temp for 2-3 hours.)
1 1/2 cups sour cream
2 eggs
1/2 cup sugar
2 tbsp. melted butter
2 tbsp. lemon juice
2 tsp. vanilla

Directions:

Pre-heat oven to 325.
Combine crust ingredients in spring form pan, or pie plate.
Using a fork, mix together and shape into crust. Set aside.

In a blender, or food processor, combine all the filling ingredients until very smooth. No lumps people!
Pour the filling into the crust.

Bake at 325 for 35 minutes (or more) until cheesecake is set (doesn't wiggle in pan). No wiggling people. Refrigerate for 4 hours or overnight.